Are you on an enjoyable RV trip and looking forward to cooking a delicious meal in your RV oven? One of the first things you’ll need to know is how to light the oven properly. In this article, we will guide you through the simple steps to safely light your oven in your RV.
1. Check the Propane Tank Level
Before attempting to light the oven, make sure your RV’s propane tank has enough fuel. Some RVs have a built-in propane gauge to easily check the propane level, while others require you to manually check the tank. Consult your RV manual for instructions on how to properly check the propane tank level.
2. Ensure Proper Ventilation
Proper ventilation is crucial when operating any appliance that uses propane. Before lighting the oven, ensure that the RV’s interior is well-ventilated. Open windows or vents to allow fresh air flow, reducing the risk of propane buildup.
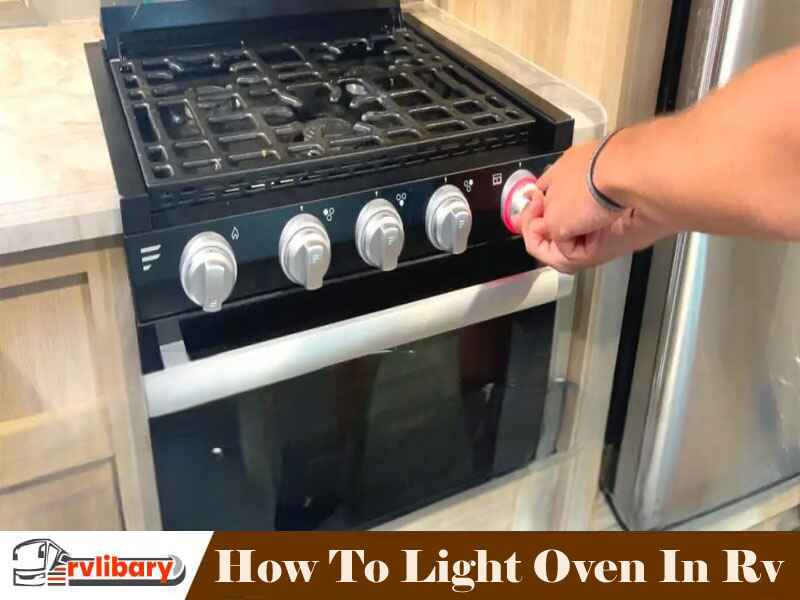
3. Locate the Oven Pilot Light
Next, you’ll need to locate the oven pilot light. The pilot light is a small flame responsible for igniting the main burner. It is usually located at the bottom of the oven, behind a small metal plate.
4. Turn on the Gas Valve
Before lighting the pilot light, you need to ensure that the gas valve is open. Locate and turn on the gas valve for the oven. Be cautious and don’t turn the knob too quickly to prevent any gas leaks.
5. Ignite the Pilot Light
Gently hold a long-handled lighter or a lit match close to the pilot light opening or ignition button. While keeping the flame close, press and hold the oven’s pilot button for a few moments. This will allow the propane gas to flow and ignite the pilot light.
6. Hold the Pilot Button
Continue holding the pilot button for about 30 seconds after the flame ignites. This step ensures that the pilot light is stable and won’t go out once you release the button.
7. Adjust the Gas Settings
Once the pilot light is stable, you can adjust the gas settings. Turn the oven temperature knob to the desired temperature. You should hear the main burner ignite once the oven reaches the pre-set temperature.
8. Monitor the Flame
While using the oven, it is essential to monitor the flame. The flame should be steady and blue. If the flame appears yellow or irregular, it may indicate a problem. In such cases, it is advisable to have your oven inspected by a professional.
9. Turn Off the Oven
After you have finished using the oven, turn off the oven temperature knob first. This will shut off the main burner. To completely turn off the oven, locate and close the gas valve for the oven. This step ensures the oven is turned off and propane is not being wasted.
10. Safety Precautions
When dealing with propane appliances, it is essential to prioritize safety. Here are some important safety precautions to keep in mind:
- Regularly check for propane leaks. If you smell gas, open windows, and do not light any flames until the area is well-ventilated and safe.
- Keep flammable materials away from the oven while in use.
- Only light the oven when needed for cooking and never leave it unattended.
- Practice proper maintenance and have your RV oven regularly inspected by a professional.
By following these steps, you can safely and easily light your oven in your RV, enhancing your cooking experience during your travels. Remember to always prioritize safety and enjoy the convenience of cooking delicious meals on the go!
Frequently Asked Questions On How To Light Oven In Rv
How Do You Light An Oven In An Rv?
To light an oven in an RV, make sure the propane tank is open, turn the oven knob to the “Pilot” position, press the ignition button, and hold a lit match near the pilot tube until the flame ignites.
What Do I Do If My Rv Oven Won’t Light?
If your RV oven won’t light, first check if the propane tank is empty or turned off. Ensure the oven knob is set to the “Pilot” position, and try relighting the pilot light. If the problem persists, consult a professional RV technician.
Are There Any Safety Precautions I Should Take When Lighting An Rv Oven?
Yes, it’s important to take safety precautions when lighting an RV oven. Make sure the area is well-ventilated, remove any flammable objects, and avoid using harsh chemicals that may cause a fire hazard. Always follow the manufacturer’s instructions.
Can I Use A Lighter To Light An Rv Oven Instead Of Matches?
Yes, you can use a lighter to light an RV oven instead of matches. Just ensure the lighter has a long enough handle to keep your hand away from the flame, and exercise caution while handling it.
How Often Should I Clean My Rv Oven For Optimal Performance?
To maintain optimal performance, it’s recommended to clean your RV oven regularly, ideally every few months or as needed. Remove any food debris, grease, and stains, using appropriate cleaning products and following the manufacturer’s instructions.